Selecting Premium Ingredients for Your Baked Alaska
Finding the Perfect Base Cake
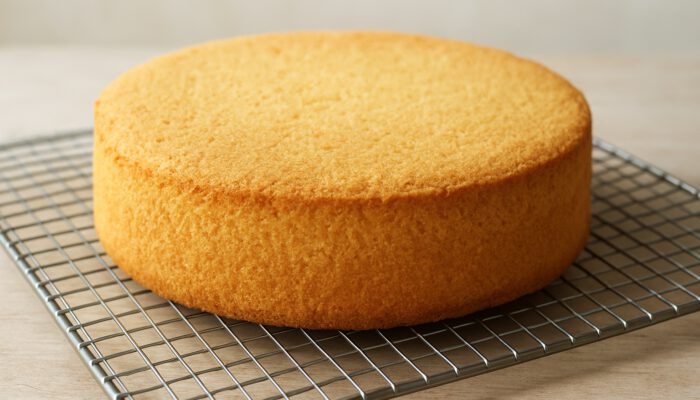
Choosing a sturdy sponge cake is essential for creating a successful Baked Alaska. A well-baked sponge not only absorbs flavours effectively but also maintains a desirable texture, avoiding sogginess. Opt for recipes that yield a light yet resilient cake, like a traditional Genoise or pound cake, as these provide the necessary support for the layers that follow.
Prepare your base cake ahead of time and ensure it cools completely before assembling the dessert. This step is crucial for maintaining its shape when layered with ice cream and meringue. Avoid overly moist cakes, which may collapse during the freezing and baking stages, leading to a disappointing dessert.
Selecting Premium Ice Cream
The choice of ice cream significantly influences the overall quality of your Baked Alaska. Seek out dense, high-fat varieties that can withstand baking without losing their structure. Brands that focus on natural ingredients and minimise air during churning will yield optimal results.
Consider flavour pairings that enhance your cake base. For example, a rich chocolate ice cream complements a vanilla sponge beautifully, while fruity options like raspberry or mango provide a refreshing contrast. Always ensure the ice cream is fully frozen before layering to achieve the best texture.
Making Light and Fluffy Meringue
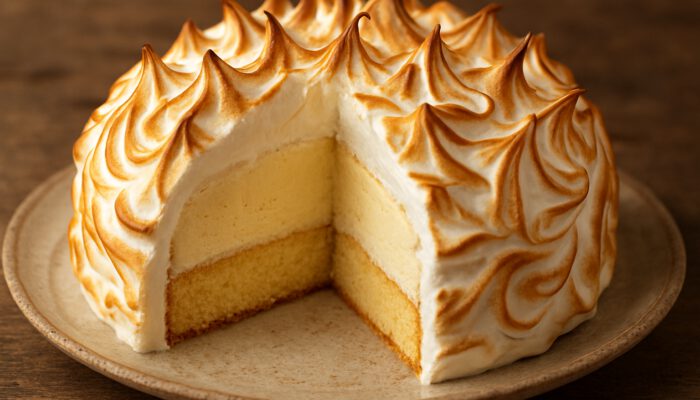
Creating a light, fluffy meringue is vital for an authentic Baked Alaska. Start by whipping egg whites until they form stiff peaks, then gradually incorporate sugar to achieve a glossy mixture. This meringue serves as an insulating layer, protecting the ice cream from heat during the baking process.
To attain a beautifully golden-brown finish, keep a close eye on both the baking time and temperature. Bake the meringue until it sets and develops a light brown hue, enhancing its visual appeal and providing a delightful textural contrast to the cold ice cream underneath.
What Essential Tools Do You Need to Prepare Baked Alaska?
Ensuring Your Oven Thermometer Reads Accurately
An oven thermometer is crucial for achieving the correct baking temperatures. Even minor fluctuations can affect how evenly your Baked Alaska browns, possibly resulting in a soggy centre or a burnt crust. Verifying your oven’s accuracy helps you avoid these issues and achieve consistent results.
Investing in a reliable oven thermometer is wise, especially when preparing delicate desserts like Baked Alaska. Place it in the centre of the oven and adjust your settings as needed, ensuring a steady temperature throughout the baking process for the best outcome.
Using Chilled Mixing Bowls and Beaters
Chilled mixing bowls and beaters can greatly improve the volume and stability of your meringue. Cold equipment helps keep the egg whites at a consistent temperature, preventing them from warming too quickly and separating during whipping. This simple yet effective step can enhance the final texture of the meringue.
For optimal results, consider placing your mixing bowls in the freezer for a few minutes before use. This contributes to creating a more stable meringue, ensuring it retains its shape when piped onto the assembled dessert.
Choosing Freezer-Safe Moulds
Selecting the right mould for shaping your Baked Alaska is essential for achieving a professional finish. Opt for freezer-safe containers that can withstand low temperatures without warping. Silicone moulds are particularly beneficial, as they allow for easy release of the frozen dessert.
Ensure your moulds are the correct size for your cake base and ice cream layers. This promotes even freezing and simplifies the assembly process, reducing the likelihood of messy edges. Choosing the right mould enhances the overall presentation of your Baked Alaska.
Employing Digital Kitchen Scales for Accurate Measurements
Precise measurements are vital when preparing components for Baked Alaska. Using digital kitchen scales allows for accurate weighing of ingredients, ensuring the perfect balance of sugars and egg whites for a voluminous meringue. This meticulous attention to detail can significantly influence the final outcome.
For the best results, weigh your ingredients before starting the mixing process. This ensures everything is ready and streamlines your workflow, allowing you to focus on creating the ideal Baked Alaska without any last-minute surprises.
Using Piping Bags with Different Nozzles
Piping bags are essential for evenly distributing meringue over your dessert. Using a bag fitted with a nozzle allows for controlled dispensing, ensuring uniform coverage that enhances both the appearance and texture of the Baked Alaska. This technique also enables you to create decorative elements that elevate the overall presentation.
When selecting a piping bag, consider the size and shape of the nozzle. A star tip can create beautiful swirls and peaks, while a round tip is ideal for smooth applications. Practising your piping technique can help you achieve a stunning finish on your dessert.
Proven Techniques for Crafting a Classic Baked Alaska at Home
Mastering Timing in Your Preparation
Timing is essential in creating a Baked Alaska, especially when coordinating the freezing and baking phases. For example, allow the ice cream layer to freeze for at least four hours or overnight if possible, ensuring it remains solid during baking. This prevents the ice cream from melting and guarantees a delightful contrast in temperature.
During the baking stage, keep a close watch on the meringue. It typically takes around 5 to 7 minutes at a high temperature to achieve that perfect golden crust. Setting a timer can help avoid overbaking, which could result in a burnt exterior and ruin the dessert.
Step-by-Step Guide for Layering Your Dessert
Layering your Baked Alaska requires precision to maintain temperature control throughout the process. Begin by placing the cooled cake base in the mould, then spread a generous layer of ice cream evenly on top. Ensure the ice cream extends to the edges to create a solid foundation that prevents melting.
Once the ice cream layer is fully frozen, apply the meringue, ensuring complete coverage of every surface. This protective layer is crucial for maintaining the dessert’s structure during baking. After assembly, return the Baked Alaska to the freezer for a final chill before baking, ensuring it remains firm until serving.
Exploring Flavour Pairings for Enhanced Taste
Flavour pairings can elevate your Baked Alaska beyond the traditional. Consider adding fruit purees, such as raspberry or passionfruit, which can enhance the overall taste without overshadowing the classic profile. These additions offer a refreshing contrast to the rich ice cream and cake.
Experimenting with various ice cream flavours can also yield delightful results. For instance, pairing rich chocolate ice cream with a vanilla sponge and raspberry meringue creates a stunning combination of flavours and textures. Feel free to be creative while staying true to the essence of Baked Alaska.
How Do You Properly Assemble the Layers?
Evenly Spreading the Ice Cream Layer
To create a stable foundation for your Baked Alaska, it is vital to spread the ice cream evenly over the cake base. Use a spatula to ensure a smooth, uniform layer that reaches the edges of the cake. This helps prevent gaps that could lead to melting during the baking process.
Allow the ice cream layer to freeze solid before proceeding to the next step. A well-frozen layer will maintain its shape, making it easier to apply the meringue without disturbing the ice cream below. This attention to detail is crucial for achieving a picture-perfect dessert.
Completely Enveloping with Meringue
Once the ice cream is frozen, it’s time to cover it with meringue. Use a piping bag or spatula to apply a thick layer of meringue over the entire surface, ensuring that no ice cream is exposed. This protective seal is critical for preventing heat penetration during the baking phase.
Pay special attention to the edges and corners, as these areas are more prone to melting. Complete coverage not only protects the ice cream but also creates an attractive finish that enhances the overall presentation of your Baked Alaska.
Freezing the Assembled Dessert
After assembling your Baked Alaska, it is crucial to freeze it for a sufficient duration to ensure the dessert remains solid until serving. Ideally, let it freeze for at least an extra hour after applying the meringue. This additional chilling time helps the meringue set and prevents any melting during baking.
When ready to bake, ensure that the dessert feels firm to the touch. This guarantees the ice cream stays solid during the brief baking phase, allowing you to achieve the desired contrast of hot and cold textures in every bite.
Research-Backed Benefits of Making Baked Alaska at Home
Key Advantages of Texture Contrast
One of the most appealing features of Baked Alaska is its delightful texture contrast. Here are some key benefits to consider:
- Hot meringue contrasts beautifully with cold ice cream.
- The sponge cake provides a soft, chewy base.
- Each bite offers a unique combination of temperatures.
- The meringue adds a light, airy texture that complements the creaminess of the ice cream.
This unique combination creates an exciting sensory experience, making Baked Alaska a memorable dessert for any occasion.
Understanding Meringue’s Insulation Properties
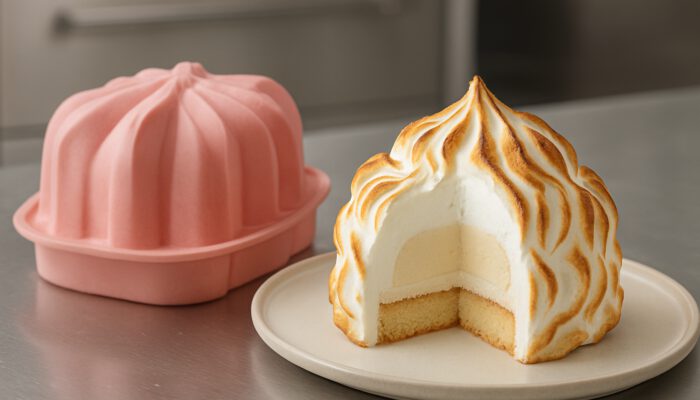
The science behind meringue’s insulation properties is intriguing. When baked, meringue forms a protective layer that effectively traps air. This air acts as an insulator, preventing heat from rapidly reaching the ice cream. As a result, the core remains frozen while the outer layer attains a lovely golden colour.
This insulation is key to achieving the classic Baked Alaska experience. The meringue’s structure allows for a beautiful golden crust without compromising the frozen centre, showcasing the delicate balance of temperatures that defines this dessert.
Creating Visual Appeal through Browning Techniques
Achieving an attractive golden crust on your Baked Alaska can be accomplished with a few straightforward techniques. First, ensure your oven is preheated to the correct temperature before placing the dessert inside. A hot oven encourages even browning while cooking the meringue.
Using a kitchen torch can also enhance the visual appeal. Carefully torch the meringue until it reaches a lovely golden hue, adding flair to your presentation. This technique not only looks impressive but also introduces a subtle caramelised flavour that enhances the overall dessert.
What Common Errors Should You Avoid?
Preventing Overwhipping Egg Whites
A frequent mistake when making meringue is overwhipping the egg whites. While achieving stiff peaks is the goal, whipping them too long can lead to dryness and cracking in the finished meringue shell. Stop whipping as soon as you achieve glossy, stiff peaks that hold their shape.
To ensure the best results, monitor the consistency closely as you whip. A good test is to turn the bowl upside down; if the meringue remains in place, it’s ready. This careful attention will help you create a smooth, stable meringue that enhances the overall presentation.
Allowing Adequate Freezing Time
Another common error is not allowing sufficient time for the ice cream to freeze solid before assembly. Inadequate freezing can lead to melting during baking, compromising the texture and appearance of your Baked Alaska. Always allow ample time for the ice cream to firm up completely.
If you’re short on time, consider using a shallow container for the ice cream to freeze more quickly. This approach helps achieve the desired firmness without sacrificing the quality of your dessert. Planning ahead is essential for a successful Baked Alaska.
Ensuring Even Application of Meringue
Applying meringue unevenly can result in exposed areas that may melt during baking. To avoid this, take your time when spreading or piping the meringue over the assembled dessert. Ensure every surface is covered, paying particular attention to the edges and corners.
A thorough application not only protects the ice cream but also contributes to the overall aesthetic of your Baked Alaska. A well-coated dessert will appear more appealing and provide a consistent texture in every bite, enhancing the dining experience.
Final Steps for Presenting Your Baked Alaska
Slicing for Neat Portions
When it’s time to serve your Baked Alaska, slicing it properly is crucial for showcasing its beautiful layers. Use a hot knife to make clean cuts, which will help prevent the layers from sliding apart. A hot knife glides through the meringue and ice cream, ensuring a tidy presentation.
Aim for even portions to ensure that each guest receives a fair share of the delicious layers. This attention to detail enhances the overall dining experience and allows everyone to appreciate the effort that went into creating this stunning dessert.
Incorporating Optional Garnishes for Enhancement
Enhancing your Baked Alaska with optional garnishes can elevate both its presentation and flavour. Fresh fruit, such as berries or citrus slices, adds a pop of colour and a refreshing contrast to the rich dessert. Consider drizzling a fruit puree or chocolate sauce around the plate for an artistic touch.
Herbs like mint can also serve as an attractive garnish, adding a hint of freshness that complements the dessert. These simple additions can make your Baked Alaska even more appealing, ensuring it stands out on the table.
Properly Storing Leftovers
If you happen to have leftovers, proper storage is essential to maintain the quality of your Baked Alaska. Wrap it securely in plastic wrap or aluminium foil to prevent freezer burn. This helps preserve the texture and flavours for future enjoyment.
When storing, consider cutting the dessert into individual portions for easier access. This allows you to enjoy a slice whenever the craving strikes without needing to thaw the entire dessert. Proper storage ensures that your Baked Alaska remains a delightful treat for days to come.
Serving at the Ideal Temperature
To fully appreciate the flavours and textures of your Baked Alaska, serve it at the optimal temperature. Allow the dessert to sit at room temperature for a few minutes before slicing. This slight warming will enhance the meringue’s texture while keeping the ice cream firm.
Aim for a serving temperature that highlights the contrast between the hot meringue and cold ice cream. This balance is crucial for delivering the ultimate experience, especially during the Australian summer heat, when a refreshing dessert is most appreciated.
Frequently Asked Questions
What Is Baked Alaska?
Baked Alaska is a dessert consisting of a sponge cake base topped with ice cream and encased in meringue, which is then briefly baked to create a golden crust.
Can I Use Store-Bought Ice Cream for Baked Alaska?
Yes, store-bought ice cream is perfectly suitable for Baked Alaska. Just ensure it is a high-quality, dense variety to maintain its shape during baking.
How Long Should I Freeze the Ice Cream Before Assembling?
It’s best to freeze the ice cream for at least four hours or overnight to ensure it is solid enough to hold its shape during assembly and baking.
What Type of Cake Works Best for the Base?
A sturdy sponge cake, like Genoise or pound cake, is ideal for the base as it provides stability and absorbs flavours without becoming soggy.
How Can I Tell When the Meringue Is Ready?
The meringue is ready when it forms stiff peaks that hold their shape and appears glossy. Ensure it is not overwhipped, as this can lead to cracking.
Can I Prepare Baked Alaska Ahead of Time?
Yes, you can assemble Baked Alaska in advance. Prepare it and freeze until you are ready to bake and serve.
What Are Some Good Flavour Combinations for Ice Cream?
Consider pairing chocolate ice cream with vanilla sponge or fruity flavours like raspberry or mango for a refreshing contrast in the dessert.
How Do I Prevent the Ice Cream from Melting During Baking?
Ensure the ice cream is frozen solid before assembly and cover it completely with meringue to create a protective barrier during baking.
What Is the Best Way to Slice Baked Alaska?
Use a hot knife for slicing through the layers cleanly. This prevents the layers from sliding apart and ensures a neat presentation.
How Should I Store Leftovers?
Wrap leftover Baked Alaska securely in plastic wrap or foil to prevent freezer burn, and consider cutting it into individual portions for easy access.
Visit our Facebook profile today!
The post How To Make A Classic Baked Alaska At Home: Simple Guide appeared first on https://cookinggods.com
The Article Classic Baked Alaska: Your Simple Home Guide Was Found On https://limitsofstrategy.com